

Building a Simple To-Do App with JavaScript: Local Storage and State Management
Create a tutorial on building a basic to-do list app, incorporating local storage for persistence and explaining state management in JavaScript
In this tutorial, we’ll build a simple to-do list application using JavaScript, where tasks can be added, removed, and stored persistently using the browser’s local storage. We’ll also explore how to manage the application’s state effectively as it evolves.
Features of the To-Do App:
Add new tasks.
Mark tasks as completed.
Delete tasks.
Persist tasks in local storage so that they remain available after a page refresh.
1. Setting Up the HTML Structure
Let's begin by creating a simple HTML structure for the to-do list.
<!DOCTYPE html>
<html lang="en">
<head>
    <meta charset="UTF-8">
    <meta name="viewport" content="width=device-width, initial-scale=1.0">
    <title>To-Do App</title>
    <link rel="stylesheet" href="style.css">
</head>
<body>
    <div class="todo-container">
        <h1>To-Do List</h1>
        <form id="todoForm">
            <input type="text" id="todoInput" placeholder="Enter a new task" required>
            <button type="submit">Add Task</button>
        </form>
        <ul id="todoList"></ul>
    </div>
    <script src="app.js"></script>
</body>
</html>
Explanation:
The form contains an input for adding new tasks and a button to submit the form.
The task list will be rendered inside the
<ul>element with the IDtodoList.
2. Basic Styling with CSS
Let’s add some basic styles to make the app visually appealing.
body {
    font-family: Arial, sans-serif;
    display: flex;
    justify-content: center;
    align-items: center;
    height: 100vh;
    background-color: #f4f4f4;
    margin: 0;
}

.todo-container {
    background-color: white;
    padding: 20px;
    border-radius: 5px;
    box-shadow: 0 0 10px rgba(0, 0, 0, 0.1);
    width: 300px;
}

h1 {
    text-align: center;
}

input[type="text"] {
    width: calc(100% - 22px); /* Adjust width to account for padding */
    padding: 10px;
    margin-bottom: 10px;
    border: 1px solid #ccc;
    border-radius: 3px;
}

button {
    width: 100%;
    padding: 10px;
    background-color: #28a745;
    color: white;
    border: none;
    border-radius: 3px;
    cursor: pointer;
}

button:hover {
    background-color: #218838;
}

ul {
    list-style-type: none;
    padding: 0;
    margin-top: 20px;
}

li {
    background-color: #f8f9fa;
    padding: 10px;
    margin-bottom: 5px;
    border: 1px solid #ddd;
    display: flex;
    align-items: center;
    border-radius: 3px;
    overflow: hidden; /* Ensures text does not overflow the container */
}

li.completed {
    text-decoration: line-through;
    color: #888;
}

/* Ensure the list item text wraps properly */
li span {
    flex-grow: 1;
    margin-right: 10px;
    word-wrap: break-word; /* Wrap text within the list item */
}

/* Style for the delete button inside the list item */
li button {
    background-color: #dc3545;
    border: none;
    color: white;
    padding: 5px 8px; /* Smaller padding for a smaller button */
    border-radius: 3px;
    cursor: pointer;
    font-size: 0.8em; /* Smaller font size */
}

li button:hover {
    background-color: #c82333;
}
Explanation:
The styles make the to-do app look clean and user-friendly.
A hover effect is added to the button, and completed tasks will appear with a strikethrough.
3. Writing JavaScript for Task Management
Now, let’s implement the core functionality of the app in app.js.
document.addEventListener("DOMContentLoaded", () => {
  const todoForm = document.getElementById("todoForm");
  const todoInput = document.getElementById("todoInput");
  const todoList = document.getElementById("todoList");

  let todos = JSON.parse(localStorage.getItem("todos")) || [];

  // Render tasks from local storage
  renderTodos();

  // Add task on form submit
  todoForm.addEventListener("submit", (e) => {
    e.preventDefault();
    const newTodo = todoInput.value.trim();
    if (newTodo === "") return;

    todos.push({ text: newTodo, completed: false });
    updateLocalStorage();
    renderTodos();
    todoInput.value = ""; // Clear input after adding task
  });

  // Mark task as complete or delete
  todoList.addEventListener("click", (e) => {
    if (e.target.tagName === "BUTTON") {
      const index = e.target.parentElement.getAttribute("data-index");
      todos.splice(index, 1); // Remove the task
      updateLocalStorage();
      renderTodos();
    }

    if (e.target.tagName === "LI") {
      const index = e.target.getAttribute("data-index");
      todos[index].completed = !todos[index].completed; // Toggle completed state
      updateLocalStorage();
      renderTodos();
    }
  });

  // Function to render todos
  function renderTodos() {
    todoList.innerHTML = "";
    todos.forEach((todo, index) => {
      const li = document.createElement("li");
      const span = document.createElement("span");
      span.textContent = todo.text;
      li.setAttribute("data-index", index);

      if (todo.completed) {
        li.classList.add("completed");
      }

      li.appendChild(span); // Add the task text inside a span

      const deleteBtn = document.createElement("button");
      deleteBtn.textContent = "Delete";
      li.appendChild(deleteBtn);
      todoList.appendChild(li);
    });
  }

  // Function to update local storage
  function updateLocalStorage() {
    localStorage.setItem("todos", JSON.stringify(todos));
  }
});

let todos = JSON.parse(localStorage.getItem("todos")) || [];
Explanation:
State Management: The
todosarray holds the list of tasks, each task being an object withtextandcompletedproperties.Event Listeners:
Submitting the form adds a new task to the list and updates the state.
Clicking a task marks it as complete, while clicking the "Delete" button removes it.
Rendering: The
renderTodosfunction updates the UI by creating<li>elements for each task, applying a strikethrough if the task is completed.Local Storage: The tasks are saved in
localStorageto persist between sessions.
4. Using Local Storage for Persistence
The tasks are stored in the browser’s local storage as JSON strings. Whenever the tasks are updated, the new state is saved in localStorage.
function updateLocalStorage() {
    localStorage.setItem('todos', JSON.stringify(todos));
}
Whenever the page loads or refreshes, the tasks are retrieved from local storage:
let todos = JSON.parse(localStorage.getItem('todos')) || [];
This ensures that the tasks remain on the page, even after a page refresh.
5. Managing State in the To-Do App
In this app, the state is managed using the todos array, which is updated whenever a new task is added, completed, or deleted. Here's how we handle different state changes:
Adding a task:
The task is pushed into the
todosarray.Local storage is updated with the new state.
The list is re-rendered to reflect the change.
Toggling completion:
Clicking on a task toggles its
completedstatus in thetodosarray.Local storage and the UI are updated accordingly.
Deleting a task:
The task is removed from the
todosarray using thesplice()method.Local storage is updated, and the list is re-rendered.
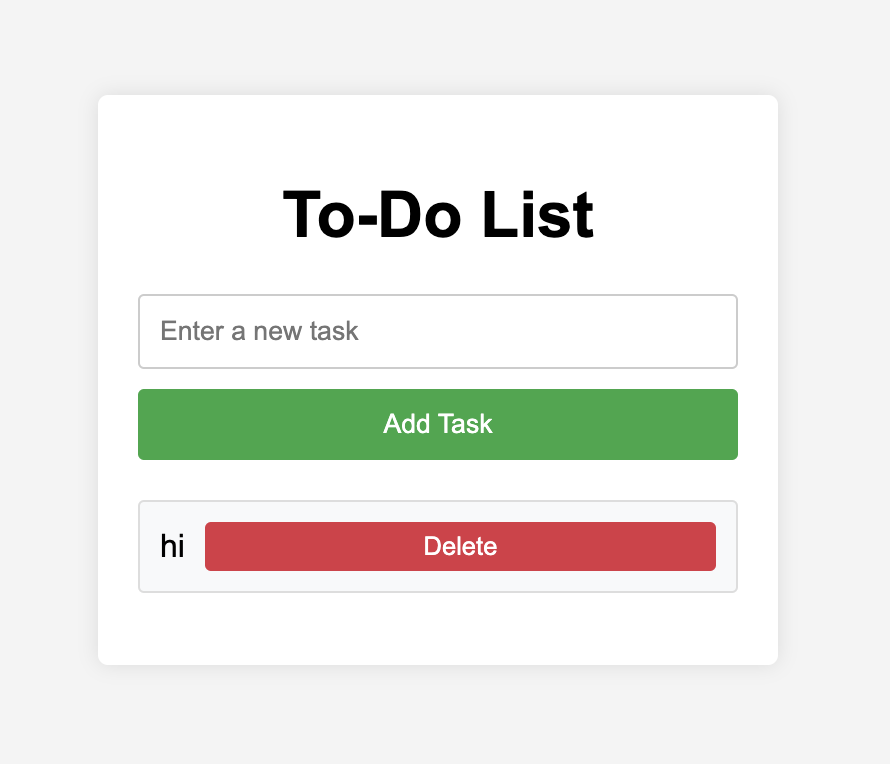
This simple state management strategy ensures the app is reactive and that changes in the state are immediately reflected in the UI
.
Conclusion
Key Concepts Covered:
Building interactive forms with JavaScript.
State management using an array of objects.
Using local storage for persisting data across page refreshes.
Enhancing user experience with task completion and deletion.
With this foundation, you can now enhance the app by adding more features like editing tasks, filtering by completed tasks, or adding due dates.
About the author
Our company comprises seasoned professionals, each an expert in their field. Customer satisfaction is our top priority, exceeding clients' needs. We ensure competitive pricing and quality in web and mobile development without compromise.
Comments
Join the discussionNo comments yet. Be the first to comment.


